Learning Outcomes
On completion of this section you will know:
- How to create an HTML table
- How to format the table

On completion of this section you will know:
A table is a rectangular grid consisting of vertical columns and horizontal rows. The area where a row and a column meet is referred to as a cell. HTML offers facilities for creating complex tables with features such as split cells and merged cells figcaptionning any number of columns and rows. Here, however, we concentrate on tables with equal number of cells in each row and in each column.
Go to topIn a previous lesson we looked at Plimmer Cottage, which is a category 1 listed building with the New Zealand Heritage trust. In this exercise we want to create a table detailing the information the trust has regarding this building. The type of table and the data to be listed is shown below in Fig 1.

The very top row here is a caption for the table and all the rows beneath it are divided into two columns.
In the second row the two cells containing the text "Category" and "Value" form the column headings for the rest of the table. The remaining rows list the different categories and the values for those categories. We shall now build a table that conforms to the above specifications.
                        <table>
                            <caption>NZ Heritage List: Plimmer House</caption>
                            <thead>
                                <th scope="col">Category</th><th scope="col">Value</th>
                            </thead>
                            <tbody>
                                <tr><td>List Entry Status</td><td>Listed</td></tr>
                                <tr><td>List Entry Type</td><td>Historic Place Category 1</td></tr>
                                <tr><td>Public Access</td><td>Private/No public access</td></tr>
                                <tr><td>List Number</td><td>225</td></tr>
                                <tr><td>Date Entered</td><td>26 November 1981</td></tr>
                                <tr><td>Date of Effect</td><td>26 November 1981</td></tr>
                            </tbody>
                        </table>
Lines 1 to 14 comprise the code for the table. (This code sample is a part of a larger document and only the table creation code is shown here.) The code for the table consist of three components:
The table caption is the simplest to explain. It consists of the text for the caption enclosed between the tags <caption> and </caption>.
The thead block figcaptionning lines 3 to 5. It has two <th></th> tags. The first one of those encloses the text "Category" while the second one encloses the text "Value". Each of them has an attribute scope which in this case is given a value of "col" indicating that the two headers are actually column headers
The body of the table spans lines 7 to 12. Each line consists of a <tr>..</tr> tags. In this cased 'tr' stands for table row.
Between each pair of <tr>..</tr> tags there are two <td>..</td> pairs.In this case 'td' stands for table data and the text between them is what appears in the table's cell.
Without any formatting the table should look as below.
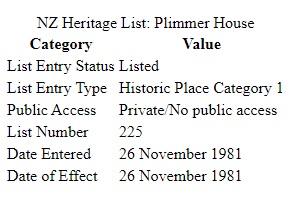
Although the data is correctly laid out and displayed this presentation is not going to win any awards so we need to apply some styling to it.
Go to topAs we are encountering more and more HTML elements and applying styling to each of them, our .CSS file is now getting quite large. Therefore instead of reproducing our entire .CSS file here we are showning it starting at line 48, i.e. where we have started adding our sytling instructions for a table.
                        table{
                            margin: auto;
                        }
                        table caption{
                            font-weight: bold;
                            border: thin solid black;
                            padding-left: 12px;
                            padding-right: 12px;
                        }
                        table thead th{
                            background-color: black;
                            color: white;
                            border: thin solid black;
                            padding-left: 12px;
                            padding-right: 12px;
                        }
                        table tr td{
                            border: thin solid black;
                            padding-left:  12px;
                            padding-right: 12px;
                        }
Lines 48 and 49 supply the only instructions for styling the table as a whole. We want it centered on the page and thus at line 49 we set the margin attribute to auto. Since he default value of display is block, setting the margin to auto will center the table.
Line 51 introduces a new idea and lines 57 and 64 expand on the same idea so we need to spend some time on those three lines in order to understand what is happening.
Line 51 has 'table caption'. There are no commas between the two elements and therefore line 51 can be read as "this is the styling for the caption element whihch is inside the body of the table element." Now looking at lines 1 and 2 of Listing 1 we see that the caption element is inside the table element, and thus we can determine that this is the caption element that the .CSS file is referring to. This means that the caption will be styled as follows: bold type, a thin black line around all sides and the left and right end will be padded 12 pixels.
At line 57 we are specifying the styling for the th element which is inside the thead element which is itself inside the table element. This can only refer to the th elements at line 4 of listing 1. These will be styled with black background and white text and a border and padding as the previous styling.
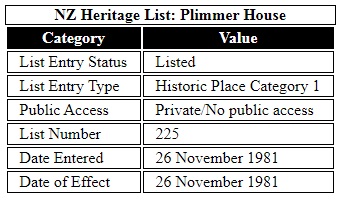
Same applies to the styling specified at line 64. Fig 3 below shows the table once the formatting has been supplied,
The learning outcomes outlined in the document focus on enabling readers to create HTML tables and apply formatting to enhance their presentation. By the end of the tutorial, readers are expected to understand the structure and styling of tables for effective data display on web pages.
The introduction explains that a table is a rectangular grid composed of rows and columns, with each intersection forming a cell. It mentions that HTML allows for complex table configurations but centers the discussion on tables with equal rows and columns to ensure clarity. This foundational explanation prepares readers for the practical examples that follow.
A sample exercise introduces a table representing details about Plimmer Cottage, a heritage site in New Zealand. The example table includes a caption titled "NZ Heritage List: Plimmer House" and uses column headers such as "Category" and "Value" to organize the data. The document then provides a code snippet illustrating how to build this table using <table>, <caption>, <thead>, <tbody>, <tr>, <th>, and <td> tags. A clear breakdown explains the function of each element, ensuring readers can replicate the process. Visual examples illustrate how the unstyled table appears.
The guide then transitions to styling the table using CSS. The tutorial highlights the importance of centering the table on the page by setting the `margin` attribute to `auto`. Specific styles for the table caption, headers, and data cells are provided, including bold text, borders, background colors, and padding for better visual appeal. The document explains nested CSS selectors such as `table caption` and `table thead th`, ensuring readers understand how to target specific elements within a table.
To reinforce the concepts, the document includes visual examples showing the unstyled table and its improved appearance after applying CSS. The styled version features a black header with white text, bordered cells, and a bold caption, demonstrating the transformative power of CSS in web design.
Overall, the document offers a step-by-step approach to creating and styling HTML tables, making it an invaluable resource for beginners looking to build professional and accessible web pages. By combining clear explanations, sample code, and visual illustrations, the guide ensures that readers can confidently implement tables in their own projects.
Go to topUsing the information provided in this document, create an HTML table that displays the following data:
Apply CSS styling to the table to enhance its appearance. Use the provided examples as a reference for formatting the table elements.
Build another table according the the instructions below.
An example of a table could be a table of rugby players, past and present. Some of the data you could use would be:
As above in Part 1, apply styling to enhance the table's appearance.
Go to top